Running an online store is not just about listing products. It’s also about flexibility, customization, and long-term cost efficiency. Many ecommerce businesses that start with BigCommerce eventually realize that they want more control over their store. That’s when migrating from BigCommerce to WooCommerce becomes the smart choice.
In this guide, we’ll walk you through the BigCommerce store to WooCommerce migration process step by step.
We’ll cover pre-migration tasks, the actual data transfer, store configuration, testing, launch, and post-migration steps.
By the end, you’ll have a clear roadmap to smoothly transition your store and start selling right away.
Why Move from BigCommerce to WooCommerce?
Here are some of the reasons why many businesses choose to migrate from BigCommerce to a WooCommerce store.
- Flexibility and Control: WooCommerce gives store owners complete control over customization. Unlike BigCommerce, which comes with limitations, WooCommerce lets you modify every aspect of your site, from design to functionality.
- Cost-Effective Solution: BigCommerce charges based on sales volume, and costs can increase quickly as your business grows. WooCommerce, on the other hand, is free to use, with affordable hosting options and scalable plugins.
- Huge Plugin and Theme Ecosystem: WooCommerce integrates seamlessly with WordPress plugins and offers thousands of free and premium extensions. You can easily add SEO tools, marketing integrations, payment gateways, and advanced inventory features.
- Ownership and Data Portability: Since WooCommerce is self-hosted, you own your store and its data. You’re not locked into a platform that might increase fees or restrict features.
- SEO and Performance Advantages: WooCommerce provides strong SEO capabilities, thanks to WordPress plugins like AIOSEO, Yoast SEO, and Rank Math. This helps improve your store’s visibility on search engines and brings in more organic traffic.
Check out: Best eCommerce Platforms for SEO
Hiring a Professional for BigCommerce to WooCommerce Migration
Migrating from BigCommerce to WooCommerce can feel overwhelming if you don’t have technical expertise. While DIY migration tools are available, working with a professional team like Seahawk Media ensures accuracy, efficiency, and peace of mind.

Our experts handle every step, from data transfer to optimization, so your store launches seamlessly without disruptions.
- Expertise in Data Migration: Our specialists can carefully transfer products, customer profiles, and order history from BigCommerce to WooCommerce. We map fields accurately and preserve essential identifiers like order IDs, ensuring zero data loss.
- Custom Store Configuration: Beyond migration, we configure your WooCommerce store to match your business needs. From setting up payment gateways and shipping zones to managing tax rules, our team ensures every feature works flawlessly.
- Advanced Optimization and SEO: We also optimize your website. Our experts configure caching, install SEO plugins, and set up 301 redirects to protect your rankings. This approach helps your WooCommerce store maintain visibility and improve performance.
- Security and Ongoing Support: With Seahawk Media, you get more than a one-time migration. We strengthen your store’s security by implementing SSL certificates, updating plugins, and configuring firewalls. Plus, we provide continuous support at an additional cost to monitor performance and troubleshoot issues.
Most importantly, when you hire us for WooCommerce migration, you free up time to focus on scaling your business rather than worrying about technical details.
We, on the other hand, ensure a smooth transition so you can start selling on WooCommerce quickly and confidently.
Migrate from BigCommerce to WooCommerce
We specialize in BigCommerce to WooCommerce migration that preserve data, protect SEO, and deliver a store built for growth.
Pre-Migration Checklist: Preparing Your BigCommerce Store
Before you begin the migration process, preparation is key. Here’s what you need to do:
- Back Up Your Data: Export customer data, product catalogs, order history, and category details from BigCommerce. A backup ensures that you don’t lose critical information during migration.
- Set Up a WooCommerce Store: Install WordPress and WooCommerce on your hosting. Make sure you install essential plugins and themes and configure the basic store settings.
- Choose the Right Hosting: WooCommerce requires reliable hosting for performance and security. Managed WordPress hosting providers like SiteGround, Bluehost, or WP Engine are excellent options.
- Plan a Migration Strategy: Decide whether you’ll use a migration tool, hire WooCommerce migration experts, or perform a manual migration. For complex stores, a professional service can help reduce risks.
- Run a Demo Migration: Before moving your entire store, run a demo migration with sample data. This helps test compatibility and spot potential issues early.
Step-by-Step BigCommerce to WooCommerce Migration
Now that you’re prepared, let’s dive into the migration process.
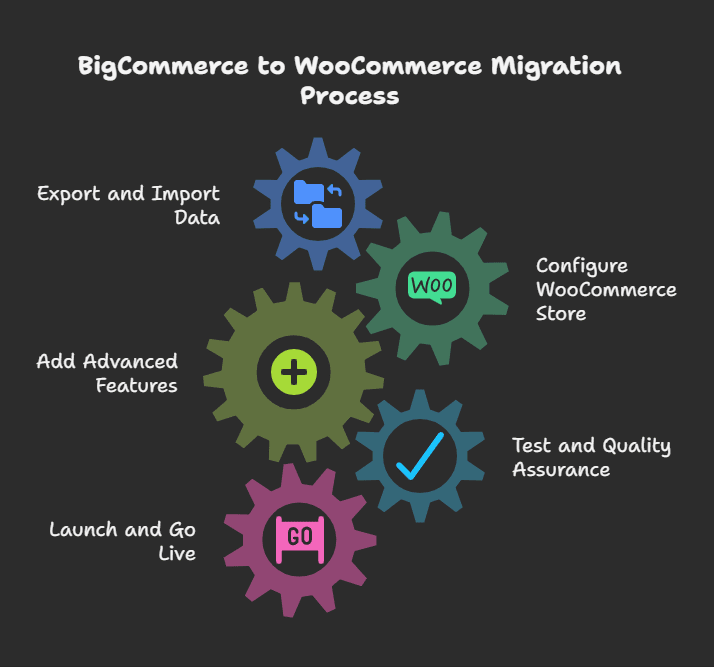
Step 1: Export and Import Data
The first stage of your migration is exporting data from BigCommerce and importing it into WooCommerce. This step requires attention to detail to ensure that no critical information is lost.
- Export Data from BigCommerce: Begin by exporting your store’s core data, which is the products, customers, and orders. Include product descriptions, SKUs, categories, images, and customer details. Also, download the order history to maintain accurate business records.
- Map Data Fields: Match BigCommerce fields with their WooCommerce equivalents. For example, map product SKUs, customer profiles, and category structures.
- Preserve Identifiers: Ensure that order IDs, customer IDs, and product SKUs remain intact. Keeping these identifiers helps maintain seamless record-keeping, consistent reporting, and smooth customer service post-migration.
- Choose a Migration Tool: Use reliable tools to simplify the process by automatically transferring data from BigCommerce to WooCommerce.
Check out: Best Free and Paid WooCommerce Plugins
Step 2: Configure Your WooCommerce Store
After you transfer your data, the next step is configuring your WooCommerce store so it works seamlessly for both you and your customers. Proper setup ensures smooth operations, accurate transactions, and a positive shopping experience.
- Set Up Inventory Management: Enable stock tracking within WooCommerce. Configure notifications for low-stock or out-of-stock products and decide how to handle backorders. This will keep your inventory accurate and prevent overselling.
- Configure Payment Gateways: Add and test payment gateways like PayPal, Stripe, or Authorize.Net. Adjust settings for accepted currencies and enable secure payment processing to build customer trust.
- Define Shipping Options: Configure shipping zones, methods, and rates based on your target markets. Add carriers or plugins to handle real-time shipping calculations for better accuracy.
- Adjust Tax Settings: Set tax classes according to your business model and regional requirements. If necessary, automate tax calculations with plugins to stay compliant.
- Activate Plugins and Themes: Install and activate themes for design, SEO plugins for optimization, and other extensions that support your business goals. Test compatibility to ensure smooth functionality.
Learn: How to Set Up a WooCommerce Product Feed
Step 3: Add Advanced Features
Once your store is configured, you can take it further by adding advanced features that boost engagement, improve customer experience, and increase sales. These enhancements transform your WooCommerce store into a fully optimized ecommerce platform.
- Enable Product Reviews and Ratings: Allow customers to leave reviews and rate products. Displaying authentic feedback builds trust, influences purchase decisions, and improves SEO with user-generated content.
- Add Wishlist Functionality: Install a wishlist plugin so shoppers can save items for later. This encourages repeat visits and helps you understand customer preferences.
- Integrate Social Media: Connect your store with platforms like Facebook, Instagram, and Pinterest. Enable social sharing buttons on product pages to increase visibility and drive traffic.
- Use Advanced Analytics and Reporting: Implement tools like Google Analytics or WooCommerce extensions for sales insights, customer behavior tracking, and conversion monitoring. Data-driven decisions can improve marketing and operations.
- Set Up Upsell and Cross-Sell Features: Configure related product recommendations on product and cart pages. Upselling and cross-selling can increase average order value and improve shopping convenience.
Step 4: Test and Quality Assurance
Before you launch, you must thoroughly test your WooCommerce store to confirm everything runs smoothly. A detailed quality assurance process helps you catch errors early and ensures your customers enjoy a flawless shopping experience.
- Run a Demo Migration: Start by performing a demo migration. Test key functions such as checkout, payment gateways, and shipping methods. This step confirms that core processes work as expected before going live.
- Verify Product Data: Review product listings, categories, images, and descriptions. Ensure that all details are transferred correctly from BigCommerce and display consistently across your store.
- Check for Broken Links: Scan your site for broken links or missing content. Fixing these issues early prevents user frustration and protects your SEO performance.
- Test Across Devices: Open your store on desktops, tablets, and mobile phones. Confirm that layouts, buttons, and menus adapt correctly for a responsive shopping experience.
- Review SEO Settings: Finally, check meta titles, descriptions, and product URLs. Ensure your SEO settings match or redirect from BigCommerce to preserve rankings and search visibility.
Step 5: Launch and Go Live
After successful testing, you are ready to launch your WooCommerce store and make it accessible to customers. This stage requires careful execution to ensure a smooth transition from BigCommerce.
- Point Your Domain: Update your domain settings to connect with your new WooCommerce hosting. This step makes your store live and redirects visitors from the old platform.
- Verify SSL Certificates: Double-check that your SSL certificate is active. Secure connections protect customer data and build trust during transactions.
- Reconfigure Email Notifications: Set up email notifications for orders, shipping updates, and customer communication. Test them to confirm accuracy and branding consistency.
- Monitor Store Performance: Launch your store and monitor traffic, orders, and customer behavior. Use analytics tools to identify trends and address any issues immediately.
A smooth launch ensures your store is operational, secure, and ready to accept new orders.
Post-Migration Steps: Review and Optimization
To achieve long-term success, you need to review your new WooCommerce store, optimize its performance, and strengthen its security. These post-migration tasks ensure that your store operates smoothly, maintains SEO value, and provides customers with the best shopping experience.
Data Review
Start by reviewing all migrated data. Double-check product listings, categories, customer profiles, and order history. Make sure no records are missing and confirm that the data displays accurately across your store. A complete data check prevents issues later and ensures operational consistency.
SEO and Redirects
Next, focus on SEO continuity. Set up 301 redirects from your old BigCommerce URLs to your new WooCommerce URLs. This step preserves your existing search engine rankings and prevents customers from landing on broken pages. Additionally, update your sitemap and submit it to search engines.
Performance Optimization
To improve website speed, install a caching plugin like FastPixel and enable browser caching. Use image optimization plugins to compress product images without reducing quality. Then, test your store speed using tools like Google PageSpeed Insights or GTmetrix to identify areas for improvement.
Security Hardening
Security is critical after website migration. Verify that your SSL certificate is active and working. Keep WordPress, WooCommerce, themes, and plugins updated to avoid vulnerabilities. Install a security plugin like Wordfence, Solid Security, or Sucuri to monitor threats. Finally, schedule automatic backups to safeguard your data.
Marketing and Customer Experience
Lastly, strengthen your marketing setup. Update your email marketing integrations and test loyalty programs, discount codes, and abandoned cart recovery tools. Ensure that customer support options like live chat or helpdesk plugins are active and fully functional. These features enhance engagement and improve customer satisfaction.
To Conclude
Migrating from BigCommerce to WooCommerce may seem like a big task, but it can be smooth and efficient with the right planning and tools. The key is to back up your data, carefully map fields during import, test thoroughly, and optimize post-launch.
WooCommerce not only gives you more control but also offers scalability, cost-effectiveness, and endless customization options. By following this step-by-step guide, you’ll minimize risks, preserve SEO value, and launch a fully functional online store that’s ready to grow.
Your new WooCommerce store will give you the freedom to manage your business on your terms, improve performance, and deliver a better shopping experience for your customers.
FAQs About BigCommerce to WooCommerce
Is WooCommerce a budget-friendly solution compared to BigCommerce?
Yes, WooCommerce is a budget-friendly solution that gives you full control over your new ecommerce platform.
Can I import products and product categories from BigCommerce?
Yes, you can easily import products and product categories from your BigCommerce data into your WooCommerce store.
Do I need technical knowledge for this process?
No, the migration can be handled without technical knowledge, as tools can transfer the store automatically.
Will my store migration cause downtime?
No, your customers can still access your source cart while the data is moved, so downtime is minimal.
How do you ensure data integrity during migration?
We map fields carefully to maintain data integrity and preserve order ids, ensuring accurate records in your target store.
What happens after the full migration?
After the full site migration, you need to review the store’s functionality and configure additional options to optimize your new store.
How do I establish the price and timeline for migration?
The price and completion date depend on your target cart, data volume, and the features you want to establish.
